Job Seeker OS: guide for new users
Complete first-time setup, fill your career catalog, connect the Chrome extension, score jobs, and move promising opportunities into applications.
01How to complete onboarding
Onboarding helps Job Seeker OS understand your experience, profile, and job-search rules. You do not have to make it perfect on the first pass: you can skip steps and return later. The more complete your profile is, the more useful your scores, resumes, preparation, and autofill will be.
Step 1. Upload resume
- Open Job Seeker OS and sign in.
- If this is your first login, the app will open
/onboarding. Otherwise, go there manually: onboarding review. - On the Upload resume step, click Upload resume(s).
- Upload 1-5 resumes in
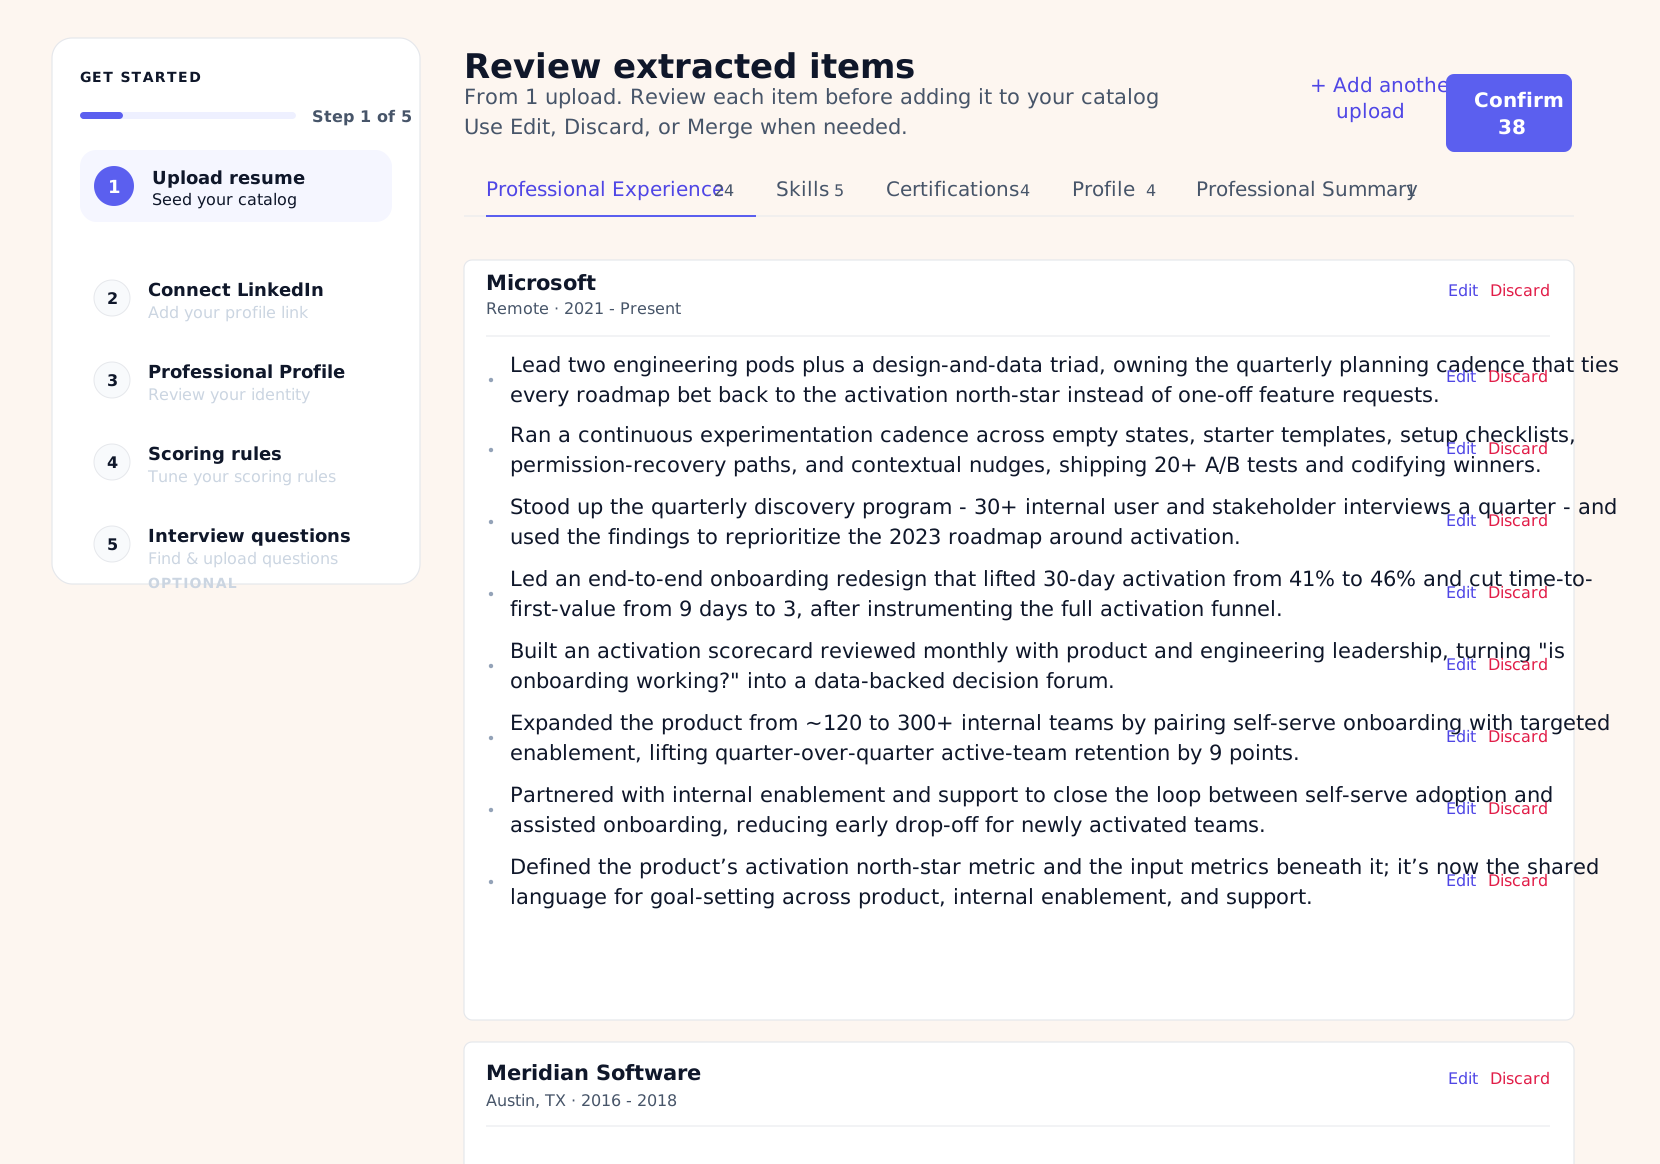
.md,.txt,.pdf, or.docxformat. - After upload, the Review extracted items screen opens.
- Review the extracted data in each tab:
- Professional Experience: roles, companies, periods, and bullets.
- Skills: skills and possible duplicates.
- Certifications: certificates, issuer, and dates.
- Profile: basic profile fields.
- Professional Summary: summary from your resume.
- For each item, use Edit, Discard, or Merge if the extracted data is inaccurate.
- Click Confirm to move the confirmed data into your main catalog.
Step 2. Connect LinkedIn
- Enter your LinkedIn profile link.
- Check that the link is a full profile URL.
- Click Continue.
Job Seeker OS saves this as a contact link so it can be added to your resumes later. It does not read your LinkedIn profile.
Step 3. Professional Profile
This information lets Job Seeker OS tailor resumes to your profile and score jobs based on your experience, role, and professional identity.
- Check your name, current role, years of experience, email, phone, location, and links.
- If you would phrase something differently on your own profile, enter the version you prefer.
- Fields save automatically when you leave them.
- Fill in Identity statement: one sentence about who you are professionally.
- If needed, add:
- Banned words: words that should not appear in generated text. For example:
dynamic,passionate,results-driven,synergy,guru. - Preferred verbs: verbs the system should use more often in bullets and summaries. For example:
launched,scaled,led,improved,reduced,automated.
- Banned words: words that should not appear in generated text. For example:
Step 4. Scoring rules
Review the pre-filled role titles Job Seeker OS recognized from your resume. In each section the role titles are on the left, and the recommendation a matching job receives is on the right:
- Strong Fit / Apply Now - roles that closely match your core profile; look at and process these first.
- Solid Fit / Apply - roles that suit you but may be slightly broader, higher or lower in level, or lower priority than Strong Fit.
- Adjacent / Review - nearby roles from an adjacent area where your experience may help, but the job is worth checking manually.
- Dealbreaker / Ignore - role titles or directions you do not want to consider.
Review the factor weights: title, logistics, impact, domain, and catalog. Job Seeker OS has already set defaults from your profile; change them only if your search should prioritize differently.
Review and, if needed, adjust logistics accept and reject, impact keywords, and domains:
- Logistics accept - cities, countries, regions, work formats, or conditions that suit you, such as remote, hybrid, or a specific city.
- Logistics reject - conditions under which a job is not worth considering, such as onsite required, relocation, or an unsuitable country.
- Impact keywords - topics and outcomes the system uses to tell a job resembles your experience and strengths.
- Domains - industries, markets, or product types that are especially relevant to you, or not of interest.
Step 5. Interview questions
- Review the questions the system matched to your experience.
- Remove irrelevant questions.
- You can skip this step and return later.
After onboarding is complete, the app takes you to Opportunities.
02How to score a job opportunity
In Job Seeker OS, scoring a job means getting a score for a job posting against your profile, experience, and job-search rules.
Through the web app
- Open Opportunities.
- Paste the job description text or job link into Paste a JD link or text to score.
- If you have it, add the Opportunity source link.
- Click Score this opportunity.
- Open the created opportunity and review the score, recommendation, reasoning, breakdown, matched groups, and evidence from the catalog.
How to decide based on the score
- Apply Now
- Strong match. Prioritize it, prepare a tailored resume or cover letter, and move quickly.
- Apply
- Good opportunity. Apply if there are no hidden dealbreakers.
- Review
- Ambiguous job. Check title, location, seniority, domain, salary, and requirements.
- Ignore
- Usually not worth your time unless there is another reason: referral, strategic company, rare opportunity.
If the score looks wrong, check these first
- Was the full job description pasted?
- Were company and role recognized correctly?
- Does the catalog contain bullets and skills that prove the relevant experience?
- Are the scoring rules too strict?
- Did a logistics or domain dealbreaker fire accidentally?
Through the extension
- Open a supported job page in Chrome.
- Open the Job Seeker OS extension.
- Start scoring.
- Check the score and recommendation in the side panel.
- If the role is a fit, save it or continue the apply flow; if not, close it or skip it.
03How to make a resume for an Opportunity
Generate a tailored resume after you have scored an Opportunity and decided the job is worth applying to. The resume should reuse evidence from your catalog, not invent experience.
When to generate a resume
- Open the Opportunity detail page after scoring.
- Review the job match score and breakdown by role, logistics, impact, and domain.
- Decide from the recommendation:
- Apply Now or Apply: go ahead and generate the resume.
- Review: first check why the system is unsure. You may need to refine the job description or your catalog data.
- Ignore: usually not worth generating a resume for this job.
- If the role is worth applying to, use the Resume & cover letter block to generate a tailored resume.
- Wait for generation to finish.
- Review the title, summary, bullets, skills, and wording for this job before downloading or sending the finished resume.
- If something reads wrong, edit the finished resume right on this page. Better still, fix the source bullets in Catalog → Professional Experience so future resumes come out better too.
- Once reviewed, the resume is ready to apply with. Make sure it contains no experience, skills, or results you never had.
04How to fill the experience catalog
The catalog is the fact base for your experience. Job Seeker OS uses it as evidence for scoring, resumes, cover letters, application answers, and interview prep.
Professional Experience
- Open Catalog → Professional Experience.
- Check companies, periods, work mode, locations, and role titles.
- If a company is missing, click + Company and add it manually.
- Review the bullets under each company.
- Add keywords to each bullet: they are used for matching in Job Search.
- If one bullet needs to be adapted for different roles, use variants.
A good bullet should include
- what you did;
- who it was for or what context it happened in;
- scale or metrics, if available;
- the result or business impact.
Skills
- Open Catalog → Skills.
- Remove accidental or overly generic skills.
- Merge duplicates.
- Add missing skills with + Skill.
- Use categories so the skills list does not become one long, hard-to-scan stream.
Professional Profile
- Open Catalog → Professional Profile.
- Check identity, contact, and links.
- Add GitHub, portfolio, LinkedIn, or other links that should be inserted into forms.
- Fill in vocabulary: banned words and preferred verbs.
Application Details
- Open Jobs → Application details.
- Fill in the data the extension can insert into application forms:
- work authorization;
- sponsorship;
- notice period;
- salary expectations;
- relocation;
- work mode;
- pronouns;
- how you heard about the role.
- Check Saved answers. When you save answers to custom questions in the extension, they appear here and can be reused.
Do not add demographic or equal-opportunity answers here: they should not be stored in the autofill profile.
05How to install and connect the extension
The extension connects your browser to your Job Seeker OS profile: it helps score jobs and fill application forms on supported sites.
Normal user flow
- Install the Job Seeker OS Chrome extension from the Chrome Web Store.
- Open Job Seeker OS in Chrome and sign in.
- Go to Opportunities and click Install extension, or open
/connect-extension. - Click Connect extension.
- Wait for the Extension connected status.
- After connection, the extension can score jobs against your catalog and scoring rules.
If you see an error, check three things: the extension is installed, you are using Chrome, and you are signed in to Job Seeker OS in the same browser.
06How to promote an opportunity to an application
In Job Seeker OS, an Opportunity is a job before it becomes an active process: you found it, scored it, sent it, or are still considering it. An Application is an active pipeline after an invitation or explicit promotion: Invited, Screen, Interview, Offer, Closed.
Promote from Opportunities
- Open Opportunities.
- Find the opportunity.
- Click Promote, or open the opportunity and click Promote to Application.
- The system moves the record to Applications with status Invited.
- The application detail page opens.
- Continue managing the process in Applications.
Use promote when the company replies, invites you to a screening or interview, or the opportunity becomes a real process.
What to do after promotion
- On the application page, check Company details: company, role, location, work mode, salary, invited and sent dates.
- Fill in Next action and Expect feedback by.
- Add contacts: recruiter, hiring manager, referral, or other people.
- The Job description tab stores the job description.
- In Preparation, use the readiness score and checklist.
- In Company Intel, click Generate to create a company research brief.
- In Interviews, add rounds: recruiter screen, hiring manager, panel, take-home, and so on.
- On the Applications board, move the card between Invited, Screen, Interview, and Outcome.
- When the process ends, move the application to Offer or Closed and set the outcome reason.
Main rule: Opportunities help you filter and choose; Applications help you manage real processes through to the outcome.